There are a few different ways to protect directories with Nginx. Password protection is typically to keep certain users out or only let certain users in. This is useful in protecting certain content on websites you do not want everyone to be able to access. This guide assumes you already have a running Nginx installation, if you do not, please see How to Install Nginx
Nginx Directory Password Authentication
Nginx can use the same user password protection as Apache using a text file with hashed passwords associated with user names.
If you do not already you will need to install the htpasswd utility
yum install -y httpd-tools
You would then create the appropriate htpasswd file
htpasswd -C /etc/nginx/.htpasswd username
Replacing username with the username you would like to use. It will prompt you to enter the password twice then write out the hashed password to the file you specified. You would then add a location block to protect your directory in the nginx configuration
nano /etc/nginx/nginx.conf
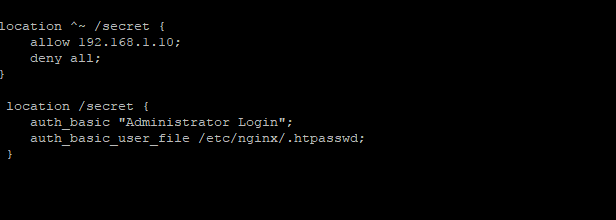
And add the following location in the server {} configuration:
 location /secret {
 auth_basic "Administrator Login";
 auth_basic_user_file /etc/nginx/.htpasswd;
 }
You would then just need to restart Nginx
service nginx restart
And the directory would now be protected. Go ahead and visit the directory you configured and you should be prompted with password prompt. If you were to enter the wrong password you would be given a 401 (Authorization required) response for not entering valid credentials.
Nginx Directory IP Based protection
Another method is to allow only certain IPs or inversely block certain IP addresses. To allow only certain IP address you will want to edit your sites nginx configuration and add the following:
location ^~ /secret {
 allow 192.168.1.10;
 deny all;
}
Replacing 192.168.1.10 with the IP you would like to allow access to the directory. To deny certain IP addresses you would need to do the following:
location ^~ /secret {
 deny 192.168.1.10;
 allow all;
}
Either of these would then just need restart Nginx to load in the new configuration.