Introduction
Nginx is a high performance web server. ANginx virtual host can be setup to host as many domains as your server can handle. If you have not already please see our guides on Nginx Compile From Source as well as PHP-FPM With PHP7 From Source. These 2 guides will lay the foundation of core services for Nginx to function as a web server. Once both of those have been completed or you already have a functioning nginx server you can continue with adding virtual hosts.
Nginx Virtual Host Preparation
First create a new directory to house the domains content
mkdir -p /etc/nginx/domain.com/public_html
Replacing domain.com with the domain you are intending to host. Make sure the directory is executable by all users
chmod 755 /etc/nginx/domain.com/public_html
Go ahead and create a php file to make sure Nginx is working with PHP-FPM
edit /etc/nginx/domain.com/public_html/index.php
vim /etc/nginx/domain.com/public_html/index.php
and insert the following php code
<?PHP
phpinfo();
?>
Nginx Virtual Host Configuration
Go ahead and create the site configuration file
vim /etc/nginx/domain_com.conf
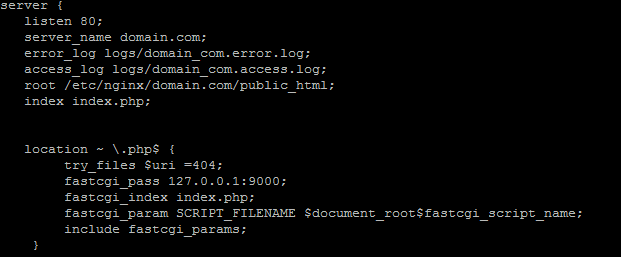
and insert the following:
server {
   listen 80;
   server_name domain.com;
   error_log logs/domain_com.error.log;
   access_log logs/domain_com.access.log;
   root /etc/nginx/domain.com/public_html;
   index index.php;


   location ~ \.php$ {
        try_files $uri =404;
        fastcgi_pass 127.0.0.1:9000;
        fastcgi_index index.php;
        fastcgi_param SCRIPT_FILENAME $document_root$fastcgi_script_name;
        include fastcgi_params;
    }


}
Replacing all instances of domain.com with the domain you are wanting to host. After you have saved that file you will want to edit the main nginx.conf to include the virtual configuration
vim /etc/nginx/nginx.conf
and add the following at the end
include /etc/nginx/domain_com.conf
After you have done that you will want to update DNS to point to a IP address Nginx is listening on your server.
You can go ahead and restart nginx to load the new configuration file.
/etc/init.d/nginx restart
After that is all done you should be able to visit your site and it should load a PHP informational page that will display all of your configuration. If you would also like to setup your site in SSL, you can use Lets Encrypt to do this for free. The instructions on how to do that are Hwo To Setup Nginx To Use SSL With LetsEncrypt