A default gateway is what linux will use to interact with other computers connected on the network. This is typically the router and will send all packets to that IP address. The actions below all use the route command, to find out more possiblities view the route man page.
View the Current Routing Table
To view the current routing table on a linux server you can do the following:
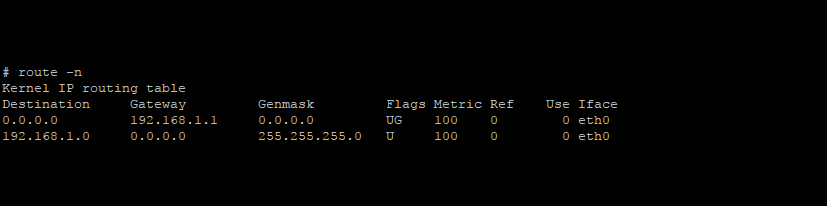
route -n

Which will return the following output:
# route -n
Kernel IP routing table
Destination Gateway Genmask Flags Metric Ref Use Iface
0.0.0.0 192.168.1.1 0.0.0.0 UG 100 0 0 eth0
192.168.1.0 0.0.0.0 255.255.255.0 U 100 0 0 eth0
You can see that the default route is the first line sending all packets to the 192.168.1.1 Gateway.
Remove A Default Gateway
To remove a default route you will need to use the following command, substituting 192.168.1.1 with the IP address of the default route you previously saw
# route del default gw 192.168.1.1
Once you have removed it confirm by doing another route -n
# route -n
Kernel IP routing table
Destination Gateway Genmask Flags Metric Ref Use Iface
192.168.1.0 0.0.0.0 255.255.255.0 U 100 0 0 eth0
Add A Default Gateway
To add a new default route you will need to use the following:
route add default gw 192.168.1.1
Once you have added the new route you will see it appear in the routing table:
# route -n
Kernel IP routing table
Destination Gateway Genmask Flags Metric Ref Use Iface
0.0.0.0 192.168.1.1 0.0.0.0 UG 100 0 0 eth0
192.168.1.0 0.0.0.0 255.255.255.0 U 100 0 0 eth0
Permanently Configure The Default Gateway
To make the new default gateway persist through a reboot, you will need to edit the network interface file:
nano /etc/sysconfig/network-scripts/ifcfg-eth0
Substitute the name of the file with the interface you are setting the route for.
Update or append the following line the file switching out 192.168.1.1 with the IP address of the default router:
GATEWAY=192.168.1.1
Once you have saved the file, you can restart networking to ensure it is working properly
/etc/init.d/networking restart