Nginx can as a reverse proxy to Apache. Nginx does best at serving static content extremely fast whereas Apache can process dynamic content and use all of the various Apache modules and .htaccess that are typically the web standard of hosting. This guide assumes you already have a Apache installation and would like to add Nginx on top of it. If you still need to install Apache please see https://linuxadmin.io/compile-apache-2-4-source/. Essentially what you are using with this guide is using nginx as a media/static content server and passing the rest of the requests to Apache. This combination can greatly improve performance over just a standard Apache web server.
You will first need to install Nginx, this guide will walk you through compiling nginx from source.
Setup Nginx Reverse Proxy
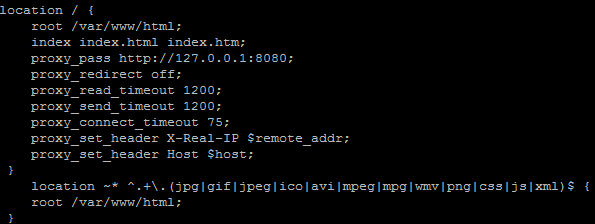
First edit the nginx configuration and add the following:
server {
 listen 80;

root /var/www/html/;
 index index.php index.html index.htm;

server_name domain.com;

location / {
 root /var/www/html;
 index index.html index.htm;
 proxy_pass http://127.0.0.1:8080;
 proxy_redirect off;
 proxy_read_timeout 1200;
 proxy_send_timeout 1200;
 proxy_connect_timeout 75;
 proxy_set_header X-Real-IP $remote_addr;
 proxy_set_header Host $host;
 }
 location ~* ^.+\.(jpg|gif|jpeg|ico|avi|mpeg|mpg|wmv|png|css|js|xml)$ {
 root /var/www/html;
 }
 }
The proxy lines allow Nginx to to grab PHP or any other files from the Apache web server which you will reconfigure to run on port 8080. If a request matches the second location block (jpg|gif|ico|avi|mpeg|mpg|wmv|pgn|css|js|xml) it will be served directly by nginx, taking the load off the Apache web server.
Reconfigure Apache
You will then want to edit your Apache configuration
vim /etc/httpd/conf/httpd.conf
and replace
Listen 80
with
Listen 8080
You will also want to update any virtual hosts to no longer use port 80
<VirtualHost 192.168.1.100:80>
Should now become
<VirtualHost 127.0.0.1:8080>
This will allow Apache to bind on the local interface only serving local requests from Nginx.
You will then want to restart both services to load the new configurations
service httpd restart
service nginx restart
Once you have completed that, Nginx will handle the initial request to port 80 and if a file type is not matched it will send it Apache to delivery the requested resource.