ProFTPd is an Open source FTP daemon, widely used for its granular configuration ability. This is a guide to provide install methods for both CentOS 7 aswell as CentOS 6 and below. You can read more about ProFTPD on the project’s website.
Install ProFTPD
ProFTPD is in the EPEL repository, you will need to install that first:
yum -y install epel-release
Run a yum update to ensure everything is up to date
yum -y update
Install ProFTPD
yum -y install proftpd
Configure ProFTPD
nano /etc/proftpd.conf
Change the server name:
ServerName "ProFTPD server"
To your servers hostname. Go ahead and save the file afterwards.
Enable and Start Proftpd
Go ahead and restart the service and enable it.
On CentOS 7:
Restart the service:
systemctl restart proftpd
Make sure the service will start after a reboot:
systemctl enable proftpd
On CentOS 6(and below):
Restart the service:
service proftpd restart
Make sure the service will start on reboot:
chkconfig --add proftpd
chkconfig proftpd on
Enable FTP in the firewall
If you are currently using a firewall, you will need to allow incoming FTP connections.
Firewalld
Allow the port for incoming:
firewall-cmd --permanent --add-port=21/tcp
then reload the firewall:
firewall-cmd-reload
Iptables
Add the new rule:
iptables -A INPUT -p tcp -m tcp --dport 20:21 -j ACCEPT
Save the new firewall ruleset:
iptables-save > /etc/sysconfig/iptables
Enabling passive connections in ProFTPD
Passive mode can sometimes resolve certain clients ability to connect to the FTP server which may have been blocked by firewalls. If you are having issues connecting remotely, would like you to try to to enable passive connections in ProFTPD you will need to edit /etc/proftpd.conf
nano /etc/proftpd.conf
And add the following lines:
PassivePorts 60000 65535
 AllowStoreRestart on
 AllowRetrieveRestart on
 TimeoutNoTransfer 65535
 ListOptions "-la"
 TimeoutIdle 65535
You will then also need to add the passive range in the firewall
Iptables:
Add the new rule:
iptables -A INPUT -p tcp -m tcp --dport 60000:65535 -j ACCEPT
Save the ruleset:
iptables-save > /etc/sysconfig/iptables
Firewalld:
Add the new port range:
firewall-cmd --permanent --add-port=60000-65535/tcp
Reload the firewall:
firewall-cmd-reload
Testing The FTP Service
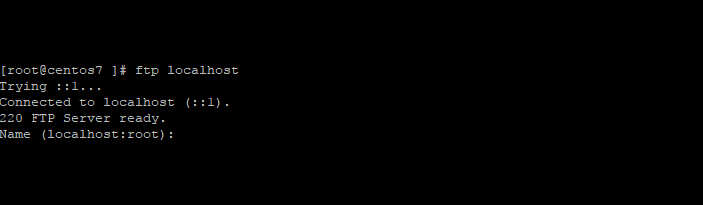
You can test the FTP configuration locally first to ensure the daemon is running by using netstat
# netstat -plan|grep :21
tcp6 0 0 :::21 :::* LISTEN 22089/proftpd: (acc
You can also connect locally by installing the ftp client
yum install -y ftp
And then making a connection to the localhost or 127.0.0.1
# ftp localhost
Trying ::1...
Connected to localhost (::1).
220 FTP Server ready.
Name (localhost:root):
And enter and valid username and password and it should authenticate. If it does not let you in, the authentication messages are written to /var/log/secure.

Hello, this is very nice and clean. I can connect on my local box, but from another VM I cannot run commands in passive mode. If I ls it says “227 Entering Passive Mode (10, 0, 2, 15, 248, 125) \n ftp:connect:Connection Refused”
I’m not sure why it’s attempting to connect to 248,125 but it’s weird.
It works locally in passive mode? Did you open the range in the firewall?
Well, I read and read the proftpd.org web site and never got my mind around this. Tried installing fro source and verious configurations all to no avail. Had to delete the VM and start over. Then I found your tutorial. It could not have been made any easier.
Thank you!
That’s great news!